基于cowrie的SSH蜜罐搭建
前言
最近在实验室摸鱼,想接触一下蜜罐,遂问经验丰富的曹老师,从他那里得知了cowrie,于是查资料准备搭个简陋的出来
基本搭建及配置
cowrie有自己的官网,上面有安装步骤,不过是针对Debian/Ubuntu的,在我阿里云的Centos上命令不能直接使用,需要找到Centos上对应的包
step1
这次我们搭建的东西不是持久化的服务或者软件,因此保证物理环境的独立非常关键,cowrie提供了Docker用来Quick Star,希望简单体验的也可以直接用Docker。
新建用户cowrie:1
2
3sudo useradd -m cowrie
sudo passwd cowrie
su - cowrie
step2
安装依赖库:1
sudo yum install -y git python-virtualenv openssl-devel libffi libffi-devel gcc make python-devel
安装失败的authbind(选装):1
rpm -Uvh https://s3.amazonaws.com/aaronsilber/public/authbind-2.1.1-0.1.x86_64.rpm
step3
github下载cowrie1
2git clone http://github.com/cowrie/cowrie
cd cowrie
step4
创建虚拟环境1
2
3
4virtualenv --python=python2 cowrie-env
source cowrie-env/bin/activate
pip install --upgrade pip
pip install --upgrade -r requirements.txt
step5
这里官网的documentation里只是开了telnet,这里推荐一下一个比较完善的配置文件cowrie.cfg.dist
官网的说法是cowrie.cfg.dist和cowrie.cfg都可以作为cowrie启动的配置文件,但是后者优先级更高一些,因此我们改为后者1
cp cowrie.cfg.dist cowrie.cfg
刚才提到的配置文件功能很多,我们挑比较简单的SSH蜜罐来配置1
2
3
4
5
6
7
8
9
10
11
12
13
14
15
16
17
18
19
20
21
22
23
24
25
26
27
28
29
30
31
32
33
34
35
36
37
38
39
40
41
42
43[honeypot]
hostname = Carter #主机名
log_path = log #日志路径
download_path = dl #上传文件的目录
data_path = data #数据目录,里面的userdb.txt保存了用户登录的弱口令,当攻击者 SSH登录符合其中规则时即可成功进入蜜罐
contents_path = honeyfs #存储蜜罐里的配置文件,如passwd和shadow等
filesystem_file = data/fs.pickle #蜜罐的文件系统
txtcmds_path = txtcmds #攻击者可以在蜜罐中执行的命令
ttylog = true
interactive_timeout = 180
backend = shell
auth_class = UserDB
[ssh]
enabled = true
rsa_public_key = etc/ssh_host_rsa_key.pub
rsa_private_key = etc/ssh_host_rsa_key
dsa_public_key = etc/ssh_host_dsa_key.pub
dsa_private_key = etc/ssh_host_dsa_key
version = SSH-2.0-OpenSSH_6.0p1 Debian-4+deb7u2
listen_port = 60001 #实际蜜罐SSH的监听端口即重定向的端口
listen_endpoints = tcp:60001:interface=0.0.0.0
sftp_enabled = true
forwarding = true
forward_redirect = false
[telnet]
enabled = false
listen_endpoints = tcp:2223:interface=0.0.0.0
[output_hpfeeds]
enabled = true
server = hpfeeds.mysite.org
port = 10000
identifier = abc123
secret = secret
debug=false
[output_jsonlog]
logfile = log/cowrie.json
[output_mysql] #mysql配置
enabled = true
host = localhost
database = cowrie
username = cowrie
password = yourpassword
port = 3306
step6
因为我们把SSH的22端口用来作为蜜罐端口,要把ssh的实际端口修改一下,以便我们自己登录,看之前blog里说nmap扫描的默认端口是到60000,因此我们设置其端口为60002,重启一下服务即可看到ssh的端口修改成功1
Port 60002
1 | systemctl restart sshd |
step7
这里我们用的数据库是最简单的MySQL,上手比较容易,对于高并发大数据量的情景可以使用ES。
因为MySQL的密码强度要求,我们先修改一下MySQL的设置,在Centos下,它位于/etc/my.cnf1
2[mysqld]
ql_mode=IGNORE_SPACE,NO_ZERO_IN_DATE,NO_ZERO_DATE,ERROR_FOR_DIVISION_BY_ZERO,NO_AUTO_CREATE_USER,NO_ENGINE_SUBSTITUTION
之后拿root登录,创建一个用户cowrie并且将权限赋予它1
mysql -u root -p
1 | SET GLOBAL validate_password_length = 6;SET GLOBAL validate_password_number_count = 0; |
cowrie自带了sql的表,我们可以直接导入1
cd /home/cowrie/cowrie/doc/sql/
1 | create database cowrie; |
启动
在cowrie文件夹的Bin目录下可以直接使用start启动1
2./bin/cowrie start
tail -f ./log/cowrie.log
改进
由于我们配置的时候多采用默认的配置,导致一些设置对于攻击者来说很容易看出是cowrie布置的蜜罐,蜜罐的交互性越低诱惑性就越低,因此我们要尽量布置的真实一点,其中一个比较明显的特点就是cowrie的配置家目录和用户都是richard,至少先把这里改一下,使用Grep搜索本目录下所有关于richard的部分,改为Carter,替换可以用vim,全局替换1
2cd ./cowrie
grep -rn "richard" .
1 | :/1,$s/richard/Carter |
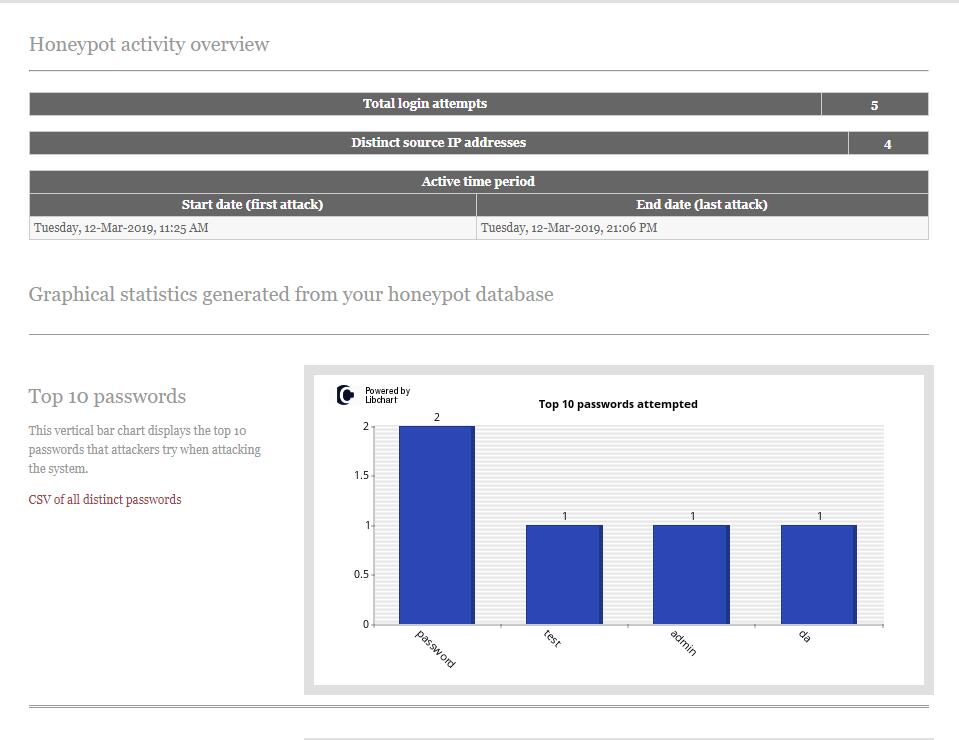
可视化
cowrie作为一个比较经典的蜜罐有很多针对其的可视化工具,这里就介绍最简单的一种——kippo-graph,顾名思义它本当是Kippo的可视化工具,不过cowrie也可以用
安装
这里使用apache作为Web服务器1
2
3
4
5
6
7yum install -y httpd php70w-mysql php70w-gd php70w-curl
git clone https://github.com/ikoniaris/kippo-graph.git
cp -R ./kippo-graph/ /var/www/html/
cd /var/www/html/
cd kippo-graph
chmod 777 generated-graphs
cp config.php.dist config.php
修改config.php的参数为自己数据库的信息1
2
3
4
5define('DB_HOST', 'localhost');
define('DB_USER', 'cowrie');
define('DB_PASS', 'PASSWORD HERE');
define('DB_NAME', 'cowrie');
define('DB_PORT', '3306');
直接查看网页发现有报错,为mysql connect的错误,查错的日志为/var/log/httpd/error_log,这里排错排了很多,包括Php版本不对,缺少一些Php库,不一而足,查google改即可,另外可以写一些测试的php文件帮助排错
效果